Welcome to our garden...... where dreams grow and memories bloom.

I am not a professional anything. I'm not a master gardener, I am not a chef, I am not a horticultralist or naturalist. I am not trying to live off the grid, or prepare for the acololypse, or go totally organic. What I am is a 40 something single mom who works full time and attends graduate school full time and is trying to build a life that teaches some values, and skills to her children while giving them some memories to carry into their adulthood.


We are starting from scratch. We have virgin land that needs a lot of work. We have plenty of time and imagination, but a shoestring budget. We may not do everything right, in fact we probably won't do much right. But we are going to do it together, and that is what matters.


Friday, April 6, 2012

Spring has Sprung!

WOOHOO!  It's Spring.  Almost.  Sorta.  We had a burst of wonderful weather that lasted for a record 9 days.  Then it went back to typical March in Indiana.  Easter weekend has arrived and the weather is pretty average right now. The kids will have to wear jackets for the egg hunts this weekend.  The surprise early warm weather started my excitement... and triggered panic.  We are nowhere near ready for planting season.

The trees are not cut down, the land not cleared, filled, leveled, enriched, tilled.  No fencing is up.  *sigh*  Life got in the way - I abruptly changed jobs last summer and had to build up a caseload so money has been tight.  Things are starting to look up financially so hopefully we can get back on track with getting the ground in shape and ready for the 300 garden challenge.

Things to do:
- cut down 7 pesky trees
- get an excavator into the area and take out the scrub brush etc.... and probably some buried trash
- backfill the low spots
- bring in topsoil for the garden
- install fencing
- buy second composter
- build raised beds and cold frames
- bring in manure (we have a source for free) for the gardens
- start seeds
- plant
- buy upright freezer
- purchase new canner
-
-
-
(I'm sure there is more).

All of this planning makes me anxious is some good and some not so good ways.  But thinking about fresh produce sends me to the freezer to see what I can make from last year's bounty.


Corn Chowder
The Cast of Players

Medium onion, chopped fine
1-2 stalks celery, chopped fine
1-2 carrots, chopped fine
1 medium potato chopped into small cubes
2 cups corn
garlic
butter
flour
milk

Melt butter ( a couple of Tablespoons) over medium heat.  You can also add a splash of olive oil to reduce scorching.  Saute the onion, garlic, and celery until the onion is translucent and the celery is soft.  

Add a Tablespoon of flour or other thickening agent (cornstarch or arrowroot) and allow to cook on low heat.  While your flour is cooking.....


Blend 1/2 the amount of corn (1 cup) and 1 cup of milk.  This gives the chowder a creamier consistency (in my opinion).  Add this to the onion-flour mixture.  Be prepared, this is not for the weak of heart... it has a pretty unpleasant appearance at this stage.
Told you so.


Add the onion-flour-corn mixture to a crock pot or stew pot along with the chopped potato, chopped carrot and remaining corn.

Add 2 cups of milk and simmer.  Once the mixture is warm through you can adjust the seasoning by adding salt, pepper, and parsley to taste.


I usually start the chowder in the crock pot several hours before we are ready to eat.  If you simmer on the stovetop you can be eating in 20 minutes.


Recipe adaptations..... add chopped red bell pepper or diced chicken.  For a creamier chowder use cream or half and half instead of milk.  For a spicier chowder add cumin to the seasoning.


Comfort food to sooth the waiting until the ground is warm enough to plant and reep for another year.

Monday, September 26, 2011

Discovery

Over the weekend - well on the sunny day of the weekend - we worked on clearing out a small section of the property.  It was pretty overgrown and creeping into the established lawn area when we purchased the house this summer.

Exhibit #1:


Eventually we will contract with someone to come in with an excavator and clear out the area for the animals pens in the wooded area, but at the moment the need is to clear the area where we need to put fencing to contain the dog.  Thus the kids and I went to work with the mower, hedge trimmers, and other assorted tools; including a bunch of elbow grease.

We made several discoveries in the process of cleaning out that little corner of the yard.

We found a bunch of trash, an old clothes line that was set in concrete and dug up and discarded with the concrete attached, some cinder blocks, a truck axle , a pile of asphalt shingles, some wire fence.....


and......RASPBERRIES!


Ironically they are located very close to the spot where we were planning to start some raspberries growing.  I am still working on trying to identify them, but from the way the large canes are spaced and orientated I am wondering if these were not intentionally planted here by the original owners.  We found 10 good sized canes spaced three to four feet apart and then a bunch of smaller off shots that had gone every which way.  I am still working on cleaning out around the larger canes to see what can be staked and managed and what needs to be forfeited for the sake of organization.  We will order some canes to add to this area, but it gives us the luxury of buying some different cultivars instead of starting this year with just basic red.

Still much work to do, and a great deal of dreaming because the finances took a big hit with an unexpected change of plans at work.  The raspberry enterprise seems "do-able" this year, the larger excavating project is now in question.  Blessed be the flexible, because they won't get broken.

Wednesday, September 21, 2011

Sing it with me.......Antici...............pation.

The long awaited (well for me it was long) composter is here.


You might ask why we selected a closed tumbler unit for composting when we live out in the middle of nowhere, there are no HOA covenants restricting what we do, and few neighbors to complain.  The simple reason is that we live in the middle of nowhere-meaning there is lots of wildlife around.  While a well balanced and managed compost pile should not have an odor, kitchen waste (even in a well managed compost set up) can attract wildlife.  I would like to avoid this.  I enjoy wildlife, and appreciate all the little critters... as long as they stay on their side of the line.  (HEY YOU RACCOONS OUT THERE.....I'm talkin' to YOU!).  Since we intend on using kitchen waste in the compost, a closed unit seemed like a good balance between having compost but keeping the critters under control.  The other reason is that we have not yet put up fencing and as cute as she is, this member of the family

has the terrible habit of rolling in "stuff" that she finds.  I get that she is following instinct and by bringing what she "finds" back to me she is identifying me as the head of the pack, but I really have no interest in chicken poo, dead worms, snail slime, or fermented apple peels from the compost pile being wiped all over me by a very happy and dirty doggie.

Once we get fencing up, and if/when we get animals we will be building a three bin open compost system to manage the manure.  For the kitchen waste however, the closed tumbler seemed the most logical way to go.


Composting is not difficult as it really is just taking what happens naturally in nature and designating where it should occur.  There is a science to it however, and it is all about balance.


Compost Basics
(disclaimer: remember that I told you I am not an expert in anything)

A good compost pile is a balance of green materials and brown materials.  Green materials are grass clippings, shrub clippings, food waste, coffee grounds, vegetable trimmings, manure, weeds (just be sure it has not gone to seed).  Brown materials are leaves, bark, sawdust, corn stalks, fruit trimmings, cardboard (shredded), newspaper (shredded).  Green materials are higher in nitrogen, brown materials are higher in carbon.  A good compost set up needs a balance of both.  A good compost set up needs moisture -damp not wet and air. 

The natural process of decomposition depends on microbes growing in your compost.  Like any living thing these microbes require food and water and oxygen to survive.  You supply the food when you place materials in the compost pile.  The water can come from the moisture in the materials (hint: green materials have more moisture than brown materials) or from adding additional water to your pile.  When you turn or aerate your pile, you provide oxygen.  The process of decomposition will generate heat, and this is a good thing.  The compost needs to be at a minimum of 120 degrees, and can reach 150-170 degrees depending on how active the set up is.  Keep in mind, that when you turn your pile, you will be releasing some of the heat that has built up.  Food wastes should ideally be placed in the center of the pile and covered with green materials after addition, so you will want to add materials to the set up in larger amount instead of numerous small additions (i.e. collect the materials for several days and then add it all at once).  An compost pile, or open bin should be at least 3' * 3' (according to most popular sources) to be able to reach the optimum temperature.  If you use a closed system the heat will be more concentrated.  The key will be to not overfill the container so that there is still air flow through the materials.

Too much carbon and the process of decomposition will be very slow, too much nitrogen and the pile will generate an odor. 


For our first try in the tumbler we added:
Corn Husks from July
Apple Peels from September
Garden Waste (weeds, old mulch) from June
Kitchen Waste (mostly coffee grounds) from August and September
and since we were adding mostly brown materials and needed some nitrogen, a couple of shovels of regular ole' dirt.


Also since we added mostly brown materials which are generally lower in moisture and much of ours was dried garden waste and dried corn husks, we used the hose to spray down each layer (except the apple peels).


The only work left to be done is to rotate the tumbler every couple of days to turn the materials and add oxygen to the process.  The only other thing to keep in mind is to leave the lid on to avoid letting any built up heat escape.
Since the decomposition process depends on reaching a certain temperature, the overall process in faster in warmer weather and can pretty much be suspended in the cold of winter.  A quick glance at Internet resources shows that a tumbler the size of ours (55 gallons) should take 3-4 weeks to break down into usable compost.  Given the coolness of the autumn evenings right now, my guess is we will be on the outside of 4 weeks if not longer. 


If we are lucky we might get two batches of compost prepared before winter halts the natural process for the year.  I'm still wondering how to best collect kitchen waste in order to be able to add it to the composter in larger batches; Guess more Internet research is in order.

Tuesday, September 20, 2011

What does a gardener do.....

.... when the weather is dreary and he/she is hit with a nasty virus?  Dream of gardening.  And find something to do to distract one's self.

For me that meant digging into the craft box and finding a long forgotten crosspoint pattern.  I've moved three times since buying this pattern and it has been far too long since I've made anything for myself.  Viola'!


The composter is here, and the rain has stopped.  Hopefully after football practice tonight we can get it moved into place and load some of the material we have been collecting into it.  Update to follow.....

Monday, September 12, 2011

The best of the season

An apple a day may keep the doctor away, but applesauce and apple butter make me happy.  Ok that was corny... you try being witty after working with 100 pounds of apples.  You heard that right, 100 pounds (technically 150 pounds, but 50 were for someone else).  That is what we returned home from the U-pick with on Saturday.  Locally Gala, Cortland and Honeycrisp were ready to pick. 

Left to Right: Honeycrisp, Cortland, Gala

Honeycrisp are a relatively new apple, a cultivar created at a University.  It is known for being firm with a sweet tangy flavor.  I think they hold up really well to cooking, and although the growers say they are good for eating I prefer a sweeter apple for a snack. Be warned however, because Honeycrisp are a newer variety of apple they are more expensive than most other apples.  At our U-pick they were $.30 more per pound.  The Cortland is a hybrid apple which is a cross between a Mcintosh ( a tart apple) and something else and the result is an apple that is sweeter than the McIntosh but has the same firm white flesh.  If you leave the skins on this apple will make pretty pink applesauce.  The Gala is a very crisp apple with a sweet taste.  These were also exceptionally juicy, dripping juice down our arms and we ate as we picked.

Our mission was to get some Honeycrisp apples while they were in season, but we ended up with Cortland and Gala as well.  Most of the Galas are being saved for school lunches and snacks.  The Honeycrisp and Cortland are being frozen and made into applesauce.

This brings us to the task at hand.  Turning nearly 100 pounds of apples into product for the freezer.  By special request we made a batch of apple butter which we will be enjoying for months to come.  Apple butter starts with applesauce.  You can use store bought sauce, but why would you when you have bushels and bushels of fresh apples on hand.

Applesauce is relatively easy.  Cut and core the apples and cook until soft. Peel on or peel off is a matter of taste.  I leave the peels on because I like the color that it gives to the applesauce; besides it is faster.  I know of some people who steam their apples, I just boil mine.  Enter - Bertha, my big stew pot.

We have another one that is even larger, fondly called Big Bertha.  Since we are still cooking on the grill, Bertha had to do today. 

Once the apples are cooked down to a soft texture (about fork smashable soft, you don't want mushy-  be careful not to overcook) you are ready to process the apples with a food mill or sieve.  I have a small 1 quart food mill, and growing up we used a large food sieve.


You can manipulate the texture of your applesauce by varying the size of the screen if you use a food mill.  I prefer a smoother texture which is produced with themiddle screen on my food mill.  The work goes faster with the larger screen and if you are going to proceed to apple butter you are going to blend it again anyway, so might as well save some effort.

Unless you like really sweet applesauce, you do not need to add any sugar/sweetener to the applesauce.  The tarter the apple, the tarter the applesauce of course.


4 quarts of sliced apples makes about 1 quart of applesauce.  Our apple butter recipe calls for 6 quarts of applesauce. 

Before we get to the apple butter, here is a trick from my mom that is very handy.  Air turns apples brown, and it will do the same to applesauce so you want to remove any air that is in the packaging prior to freezing your applesauce.  If you are canning it, the first half of this trick will work for your jars.

Pour the applesauce into your bag (or jar) and tap the bottom of the container on the counter.  This will cause any air bubbles inside to come to the surface (this works of cake and quick bread batter as well preventing those weird "tunnels" that show up when you bake).  Then insert a straw into the bag of applesauce.  Seal the zipper bag around the straw and squeeze out as much air as possible.  Kneed the bag directing any remaining air bubbles towards the straw.  Once you have all of the little air bubbles out remove the straw and completely seal the bag. 

See the air bubbles?

bounce the bag on the table to force the air bubbles to the surface

Squeeze the air out and pull out the straw

See, no bubbles!

Lay the bags flat in the freezer.  Once they are thoroughly frozen you can stand them side by side (like books on a shelf) to save space.

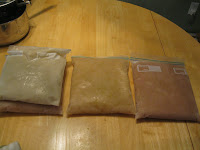
left - Honeycrisp, peelsoff
center - Honeycrisp, peels on
right - Cortland, peels on


You have been very patient, so here is the recipe for apple butter.

Homemade Apple Butter
You will need:
6 quarts applesauce, divided
3 cups sugar, divided
1 T ground cinnamon (or 4 cinnamon sticks)
1 t ground cloves ( or about 6 whole cloves)
(some recipes call for allspice in addition to the cinnamon and cloves, can't stand the stuff but I thought I would mention it for those who are adventurous)
Crock Pot

Pour 4 quarts of applesauce into the crock pot and add 1 1/2 C of sugar and all of the spice.  Stir well.  The applesauce will cook over night and reduce by half or more.  I usually start cooking about 8pm on high for an hour or so and then reduce the heat for the overnight cooking.  Do not cover the crockpot.  It may splatter depending on the size of your crockpot so you can place the cover on loosely and vent it (put a spoon under one side) or use a splatter cover.  In the morning (after about 12 hours of cooking) remove and skin that has formed on the top of the apple butter and discard.  Stir the mixture well.  It will be dark and thick (and should smell heavenly).  Add the remaining applesauce and 1 cup of the remaining sugar and stir well. Do not panic when the consistency changes from looking like apple butter to looking like thick applesauce, you are going to cook this down again.  Cook for an additional 2 hours.  You are now ready to taste test your apple butter.  You might want to add the remaining 1/2 of sugar if your apple butter is not sweet enough. If you add more sugar you are going to need to cook for another 1-2 hours to allow the sugar to dissolve and blend.  You might want to put the cover on for this additional time depending on how thick your apple butter has gotten. 

If you did not add additional sugar, you can decide on the texture you want.  If you prefer a thicker apple butter you might want to cook longer.  Using a stick blender or traditional blender process the apple butter until it has a smooth texture.  If it thins out when you blend it, just leave the heat on for a while longer.  If the texture seems right transfer to container, jar, or bag.  In our case, the apple butter went straight from the crock pot to the breakfast table.


Wednesday, September 7, 2011

Mischief Managed

Or rather - brush pile managed.

A couple of weeks ago we had two large trees taken out.  The guys who did the work said they would pile all the wood etc at the edge of the yard.  Well - the trees themselves were cut up into 18"-24" pieces right where they fell.  They did pile the brush up into three huge piles.  The contractor for the addition to the house called today and apparently after several delays they are going to start work this week.  Tomorrow to be exact.  The guy is bringing some heavy equipment to do the site work and in a day or two there will be a concrete truck here to pour the slab for the garage.

What does this have to do with gardening?  Nothing, this is just what happened today.  But I figure since this is my blog and all, well I can write about whatever I want.

So anyway..... I look outside and see these huge piles of brush in about the spot I imagine that they are going to need to back said heavy equipment and concrete truck into to be able to work on the spot for the garage.  I decided that I had better get to work on that brush pile.

A not-quite-before picture.  I had already done a couple of hours of work piling up the logs before I thought about taking any before pictures.


We dropped an 18 foot walnut tree and a 20 foot oak tree.  Neither were in good shape, and both were in the way of the planned driveway.  I don't think either tree was worth anything as standing timber, but in a year or two we will have some great firewood. 

We still need a day with a chain saw and a log splitter to break the logs down into firewood pieces, but at least for now the mess is a bit more organized and out of the way.


I did not get into this venture thinking it would be glamorous, and man let me tell you.... the sight of me today sweating and swearing moving those logs was not.at.all glamorous.  Worth it, just not a pretty sight.

Monday, September 5, 2011

We have Hummingbirds!

And I am just jumping up and down.  Hummingbirds, you see, have a very special place in my heart.  It would take days and days to explain why and even then you might just stare at me dumbfounded and wonder if I am blond under all this rustwater red hair.

These are probably hummers starting their migration route to warm weather wintering grounds.  I was not sure if we would see any since we were not here for the spring migration.  I had not unpacked my feeders thinking it would be for nought.  And yes ....plural; Many times plural. I have a great collection of hummingbird feeders and at the old place had more feeders per square inch on our small suburban plot than any person in their right mind would have. 

Anyway.

Last Thursday I was wearing a red shirt on the way out to the football game and got buzzed by a hummingbird so big that it sounded like a B52 bomber going through.  She spun around and came at me head on and stopped right by my ear.  "excuse me, I know you are new here but the deal is that you are supposed to put out nectar for us.... see?"

I cleaned out one feeder to see if she would come back.  She did!  *happy dance*.  I replaced the sugar water this morning and added an additional feeder and was promptly rewarded.  A hummingbird (male this time) came in and hung right in front of my nose.  The breeze from his wings actually moved my hair.  He then lighted on the bigger of the two feeders and ate his fill. He was joined by a fat female, who I assume was my original visitor. I will have to start taking the camera out with me mornings and see if they will pose for a snapshot or three.

With hummingbirds around, this place might start to feel like home.